Why to add custom domain?
You already have your blog in blogger. You are sharing ideas and writings to peoples around world. You are using custom domain of blogspot.com what if you could use your own domain? And in case of Nepal .np domains are free and we can simply register own domain and start using it For free with blogger. It looks professional, whenever you have your own domain in blog it looks like you actually own the site and it will be all yours. People would refer your domain as site "S/he have a site" sounds better then "S/he have a blog in blogger". Easy to share with other, you can simply give your domain name insist of blogspot address.How to add .np domain in blogger?
Generally, all the domain register provides DNS management to their users. But .np domain register does not supports DNS management tool, so we need a Domain Name Server management tool first of all. For simple understanding a domain name is not just an URL for a website. You can use this for email service too. Any number of sub-domain can be created from a domain name. To load any page it should have some contents, all the contents are stored in server. Domain name are for human remembrance only browsers works through IP. So your domain should point some IP so that the request could reach the resource and display the response. For that, we should point our domain and subdomains to servers. But in .np domina registartion there is no option other than Name Server. So we need DNS management tool.The most popular DNS management tool is cloudflare and godaddy free DNS manager. So, First create your account on any of these service. Then add your domain. Now, to set up blogger with your custom domain first go to blogger.com and settings.
In the general settings and Publish section there is option called set up 3rd party domain. Click in that option. Now, add your domain in the required field. Note you can only use Sub-domain in blogger. So, Better to use www.domainname.com. Now you will get some error message and there are two instructions you need to follow.
1. Add a CNAME record to point your sub-domain to blogger blog.
2. Add a CNAME record to verify the ownership of your domain.
 |
| Adding .np domain in Blogger |
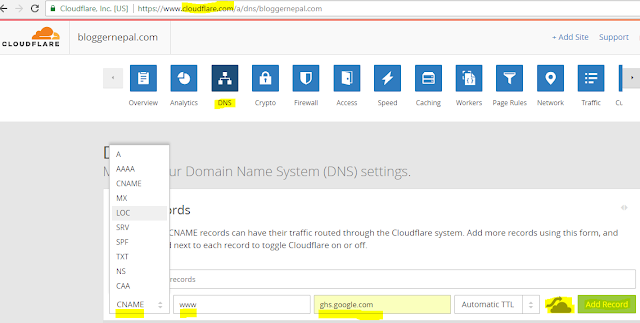
Login in back to DNS management tool and select your domain you are working with. Then click in DNS or Manage DNS. Then select CNAME as a record type, Sub-domain we take example of (www) in the name section and ghs.google.com in the host/point to section leave other option as default and click add Zone Record.
 |
| Adding sub-domain www in cloudflare |
Again Add the other information provided by the blogger. This one is unique to each users as it is for verification of the domain. (Skip the Cloudflare security if you are on Cloudflare).
 |
| Adding sub-domain and point address in Cloudflare |
Remember it could take up to 48 hours to resolve domain. Just stay calm but in general condition it would happens with in some 30 minutes.
How to enable https in custom domain?
So, here we are, So how can we enable https in our .np domain as a custom domain in blogger. HTTPS for custom domain is still in development phase in blogger, so it is not available in general blogger website. We need to access some special blogger section to access the development phase feature. To enable https in custom domain in blogger visit to draft.blogger.com. Then go to settings, In General settings HTTPS section be low publishing tool select the option to add HTTPS supports to your custom domain. It would take some time to set up SSL for your domain. It would take about 3-6 minutes in general case, If it takes some time don't worry it would be enabled in your site really soon. And you cannot use the option below the HTTPS section when SSL is being processed. Refresh the page and turn that option to Yes. |
| How to add .np domain in Blogger with https |
By now your site is running under HTTPS secure connection. Today we talk about adding .np domain to blogger blog as custom domain and use SSL (HTTPS) in the custom domain the official way. Have a good day :)


0 Comments